Google Analytics has become an invaluable tool in measuring the impact of digital marketing campaigns on various elements such as online traffic, user behavior, and conversions. One of its most powerful features is data import, which allows marketers to analyze and compare various data points beyond what GA4 collects by default.
But what happens if your advertising data comes from non-Google platforms like Facebook Ads, Instagram, Twitter, Bing, or Pinterest? Can you still measure critical insights, such as cost data and return on ad spend (ROAS), within GA4? The short answer: Yes! With Importing Cost Data Into Google Analytics 4, you can consolidate cost data from multiple advertising sources, ensuring a holistic view of your marketing performance.
In this guide, we’ll explore why cost data import is essential, how to set it up in GA4, and solutions to common challenges businesses face during the process.
Why Import Cost Data into GA4?
-
Centralized Campaign Performance Analysis
Imagine toggling between Facebook Ads, LinkedIn Campaign Manager, and Google Ads just to evaluate performance. It’s tedious. By consolidating this data into GA4, you can compare campaigns side by side, saving time and effort. For example, a digital marketing agency managing multi-platform campaigns for clients can benefit immensely from a single source of truth. -
Enhanced ROI Measurement
Let’s say your Facebook Ads campaign cost $2,000 and generated $5,000 in sales. Without integrating this cost into GA4, calculating ROI requires manual effort. Importing cost data allows GA4 to compute key metrics like return on ad spend (ROAS) automatically, offering real-time insights into campaign effectiveness. -
Improved Attribution Models
Comprehensive data integration enhances GA4’s ability to attribute conversions across channels accurately. For instance, if a customer first discovers your business through a Google search ad and later converts after clicking a LinkedIn ad, GA4 can better distribute credit across touchpoints. This helps you optimize the right channels for future campaigns.
But before anything, what is data import?
The term “data import” is pretty self-explanatory – it is a feature where you bring information, often in spreadsheets, from external sources into another platform. In this case, that platform is GA. It allows the user to centralize data in a single location for easy management.
GA’s built-in information would include the page path, sub-directory level, title, and hostname. By using data import, you can view insightful metadata on pages of other websites such as the type of content, author, headline, publish date, section, among others. This way, you can categorize data and look further into them. For instance, you might want to know which headlines drive traffic to your website or increase conversion rate when there are more videos on pages.
You can execute data import from online platforms and offline tools such as CRM. Fortunately, GA maps such data, which could be about the user or product itself and imported according to types such as user ID, client ID, metadata, and offline events. You can upload this data at the time of reporting or collection. Other data can pertain to refunds, campaigns, geographical, content, custom, and cost.
 Pros of Google Analytics data import
Accommodating data import makes for more versatility of the data itself and the GA tool. Importing data provides a consolidated view of your numbers and other valuable information. When you can blend different data into the mix, you can determine the number of views and shares your content produced, which pages got more sales, how many refunds there were, and other details that are relevant to your needs.
Here is the list of data fields you can import to Google Analytics:
Required:
- Campaign ID (utm_id)
- Source (utm_source)
- Medium (utm_medium)
- Date (ISO 8601: YYYY-MM-DD)
Optional, but recommended:
- Name
At least one of the following metrics is required:
- Clicks (daily value) (optional)
- Cost (daily value in the format 0,000.00) (optional, but expected)
- Impressions (daily value) (optional)
With data import, you can save time from repeatedly switching between your channels to see if your marketing efforts are paying off. You can also import data from your sales in a brick-and-mortar store, for example, to GA and analyze them alongside your digital store sales. It will then give you comprehensive information of your company sales in their entirety.
Using the GA data import feature makes GA highly visible by placing it on top of your tool list. The latest GA iteration, Google Analytics 4, has scalable analytics across different platforms and provides user identification within. This added functionality only means that you can collect standardized data for any of your platforms and devices with just one report. As such, you have improved data quality.
Aside from the benefits of importing data to GA, it can present data like cost, CPC, CTR, and ROAS from multiple non-Google channels such as Facebook, LinkedIn, Twitter, Pinterest, Bing, and Reddit. The user can compare results and the ROI and know which marketing channel the credit goes to.
Steps to importing cost data – Manual Method
When your data comes from Google Ads, the import process will be a breeze, given the native integration of both services. Otherwise, you will take the manual route since it involves taking data from non-Google resources. This action may take a little longer but is still doable once you get the hang of it.
1. Creating a CSV file
The manual importing of cost data will require you to present your data in tabular form from your external channel to enable uploading to GA. That said, having two or three non-Google resources shouldn’t be too tedious. But if you’re handling more than three channels, it can be very time-consuming.
To create a CSV file for uploading to GA, you can fill it with cost details and other ad service metrics.
When encoding the date, it should be formatted in 8 characters, beginning with the year, month, and day, or YYYY-MM-DD, with no spacing in between. Furthermore, there is also a proper format when including campaign names in your CSV file. The details inputted in the CSV file should be the exact campaign names manually tagged in the URLs. Otherwise, it will cause duplicate campaigns in the GA platform, which will result in split data instead of attributing it to just one distinct campaign.
For more information on building a file for your cost data, you can also refer to the Google Analytics Help page.
2. Create of a data source in Google Analytics
After creating and filling out your CSV file with your cost data, you will create its data set in GA. Your first step is to go to the GA Admin panel and follow this sequence: Data Import, Create, Cost Data, then click Continue.
Provide a name for your data set and click Continue once again. Under Data Set Schema, which lists the metrics and dimensions of your imported data, make sure to provide for at least two fields of data sets. The first one should contain the three prerequisites: date, source, and medium. For the second field, you should choose one of these three parameters: cost, clicks, impressions. The third field is composed of optional parameters. For example, you can add ad content to your analytics.
When you repeat your cost data import, you can choose what you want to do with it by going to Import Behavior. Choose Summation when adding new data to the existing one. On the other hand, you can also replace data by choosing Overwrite. Once you have made your adjustments, click Save. You can view this new data set in the Data Import menu.
3. Uploading your cost data CSV file to Google Analytics
You are now ready to upload your CSV file. While in Data Import, click Upload File, select the file, and confirm the action by pressing Upload. If done successfully, your status will be displayed as Completed. Please note that this process will take up to 24 hours before it reflects in your reports.
On the other hand, you might encounter errors during the data import process such that your status is Failed. There is no need to worry, though, because you can easily identify such errors and correct them accordingly by clicking on the Failed link. With each correction you make, click Refresh until the errors have been cleared.
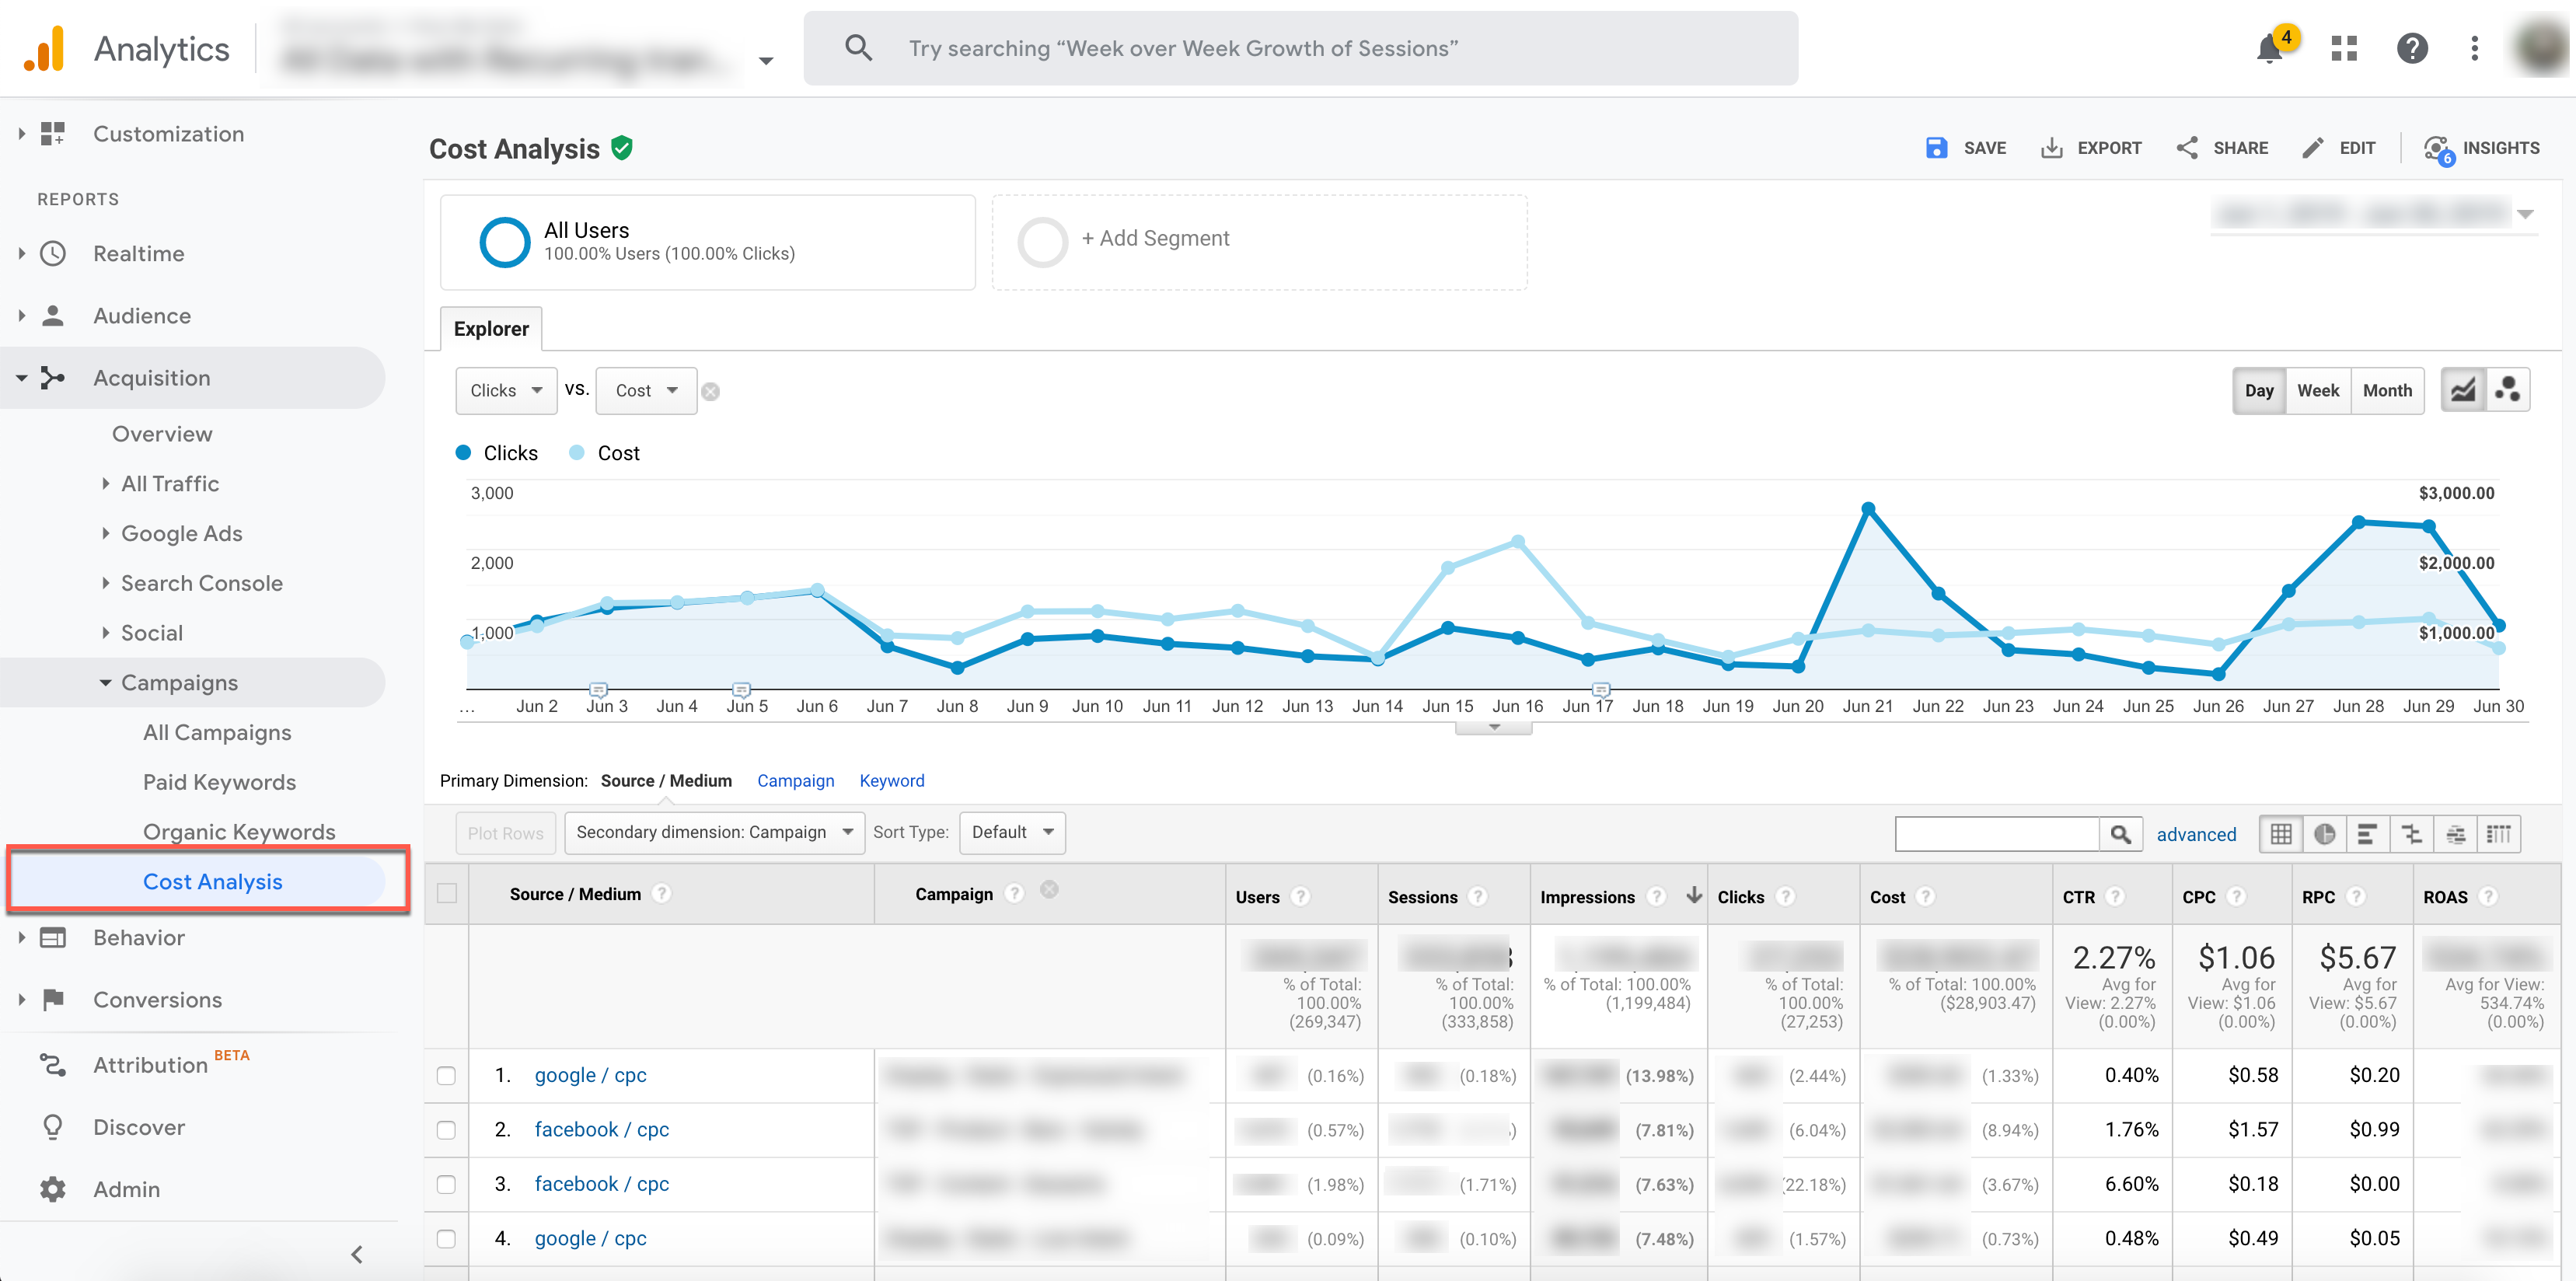
When everything has been accomplished, your cost data will be available for viewing in GA. Simply proceed to Acquisition, Campaigns, Cost Analysis, and start analyzing, reviewing, and comparing your cost data across all the other marketing initiatives you have.
Steps to importing cost data – Automated Method
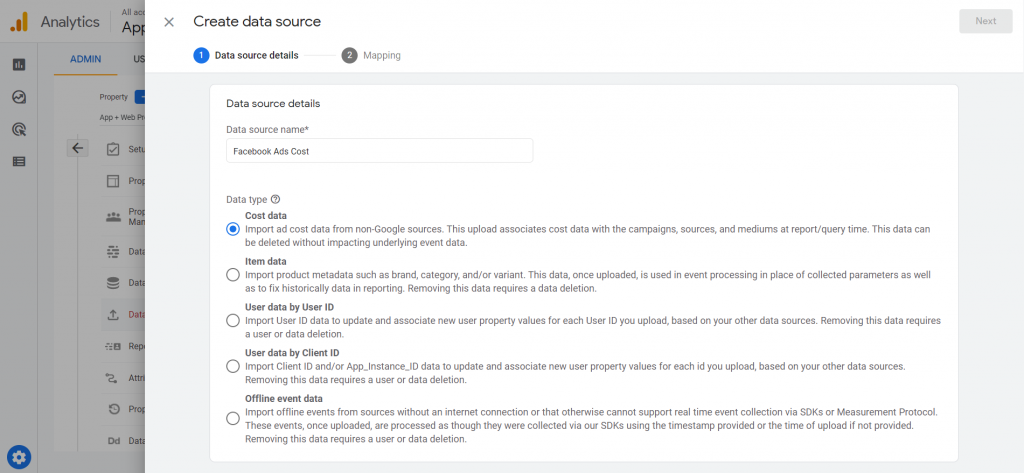
1. Create of a data source in Google Analytics
Similar to the Manual method, you’ll need to create a data source as well.
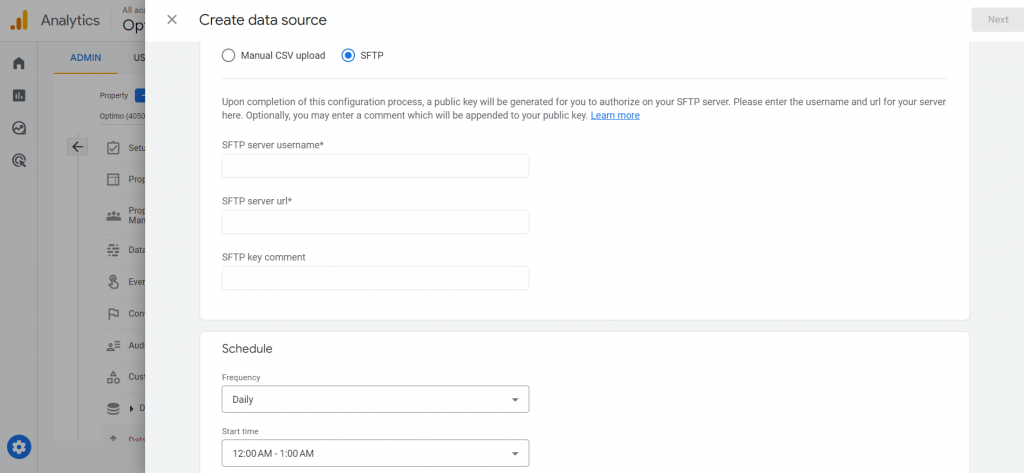
2. Configure your GA4 SFTP server
After successfully establishing your data source, the next pivotal stride involves seamlessly configuring your SFTP server. This imperative process for facilitating GA4 cost data imports is accomplished through the following carefully orchestrated steps:
- Selecting an SFTP Server: Opt for any SFTP server that supports SSH authentication. Prominent options encompass OpenSSH, FileZilla Server, and ProFTPD.
- Creating an SFTP User Account: Forge an exclusive SFTP user account tailored for uploading cost data files. Ensure that this account possesses the necessary permissions to access the designated directories where cost data files are stored.
- SFTP Server Setup: Skillfully configure the SFTP server to welcome incoming connections originating from your GA4 account’s IP address(es). Consulting the SFTP server’s documentation may prove beneficial for this endeavor.
- Generating SSH Key Pair: Create an SSH key pair to authenticate the designated SFTP user account. Tools like PuTTYgen simplify the key pair generation process.
- Sharing Public Key with Google: Enhance authentication by sharing the public key with Google, adding it to your GA4 account’s SSH key list. This facilitates seamless cost data file upload by Google.
Upon successfully navigating these steps, you’ll be poised to seamlessly configure your GA4 account for cost data import from the SFTP server. For the final touch, simply paste your SFTP server username and URL into the respective fields to complete the setup. This cohesive approach empowers you to harness the full potential of GA4 for robust data analysis and informed decision-making.
GA4 facilitates an automatic connection test: Validate this connection by uploading a test cost data file to the SFTP server through the designated SFTP user account. Ensure the file is correctly placed within the designated directory and is accessible for reading by Google.
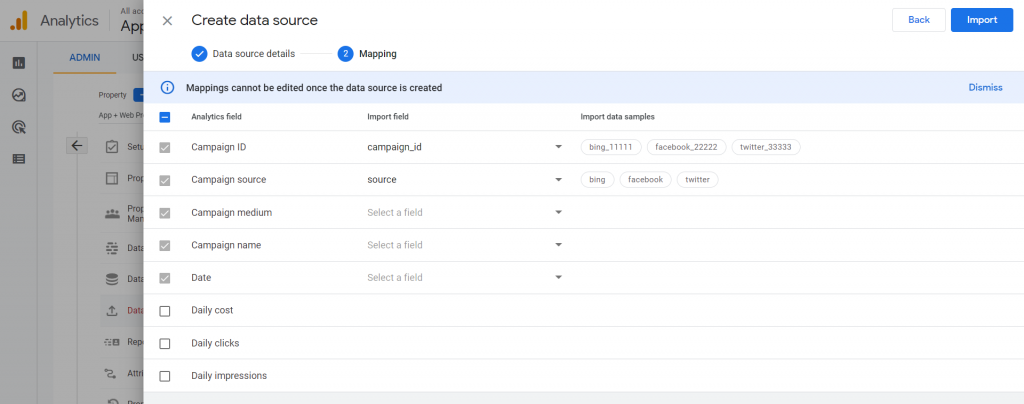
3. Map the cost data to Google Analytics
Other things you should remember about cost data import
Now that you have uploaded your most recent cost data to Google Analytics, you can begin to study your campaign using a more in-depth approach. This phase includes calculating your ROAS or RPC using Google BigQuery to merge data, allow performance comparisons among ad services, and evaluate campaigns by setting up a Funnel Based attribution model.
You can also customize a cost analysis report by adding a second layer which will enable you to present data by ad content or keyword. Just click Edit on the report, where you can adjust drill-down dimensions or add more metrics.
Furthermore, you can automate the import process when dealing with cost data from multiple sites. <Data Import provider> is one of the tools you may consider, which can unify data from multiple sources while being capable of advanced analytics and attribution. Their fully automated marketing reporting with deduplication ensures precise data will be ready in no time.
Challenges and Solutions
-
Data Formatting Errors
Problem: Missing or misaligned columns in CSV uploads can cause import failures.
Solution: Double-check that all required fields (e.g., utm_id, cost) are included. Tools like Microsoft Excel’s data validation feature can help. -
UTM Parameter Inconsistency
Problem: Without consistent UTM tracking across campaigns, GA4 cannot link cost data to specific campaigns.
Solution: Use a URL builder tool, such as Google’s Campaign URL Builder, to standardize UTM parameters. -
Technical Complexity of Automation
Problem: Setting up an SFTP server requires technical knowledge.
Solution: Third-party solutions like OWOX BI automate the import process, eliminating the need for manual uploads or complex setups.
Benefits of Integrating Cost Data
Better Budget Allocation
With cost data in GA4, you can see which channels drive the most conversions at the lowest cost. For example, if TikTok Ads consistently deliver $10 CPA while Facebook averages $20 CPA, you know where to shift resources.
Real-Time Optimization
GA4’s dynamic dashboards let you monitor performance in real time. If a campaign starts underperforming, you can adjust strategies without waiting for end-of-month reports.
Comprehensive Insights
Combining online and offline data paints a full picture of customer behavior. For instance, importing offline event data, like in-store purchases, can reveal how online campaigns influence foot traffic.
Conclusion
Importing cost data into GA4 is a game-changer for businesses aiming to optimize marketing performance. It centralizes analysis, improves attribution, and enables smarter budgeting. While challenges like formatting errors or automation setup may arise, tools like EasyAutoTagging and OWOX BI simplify the process. By integrating cost data, companies like HubSpot have gained actionable insights to drive better results—and so can you.