What Will Salesforce and Google Analytics Integration Do For You?
Because of this, you can only measure what your customers are doing on your website, but you don’t know how many of your website visitors actually became paying customers down the line.
Apart from having Google Analytics 360 with the native connector, this is the easiest and fastest solution that will connect your online to offline data so you’re able to answer many questions like:
- Which campaigns are driving the most qualified leads and sales?
- Which digital marketing channels are getting larger deals?
- What’s the difference between the online behavior of qualified and unqualified leads?
Preparing Salesforce and Google Analytics
Before being able to send any of your Salesforce data to Google Analytics, you’ll have to do a few things so that each platform is able to send or receive the data necessary to collect and report correctly.
Create Custom Dimensions and Metrics in Google Analytics
Although not all custom dimensions and metrics are required, this is a list of what can be passed to Google Analytics and should be added:
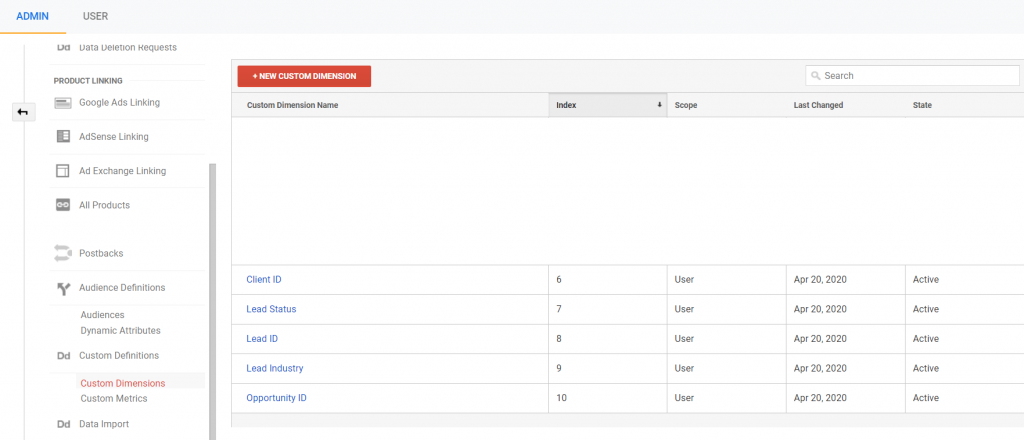
1. Go to your Google Analytics property, and open Admin – Custom Definitions – Custom Dimensions.
2. Click “New Custom Dimension” and create the following custom dimensions as shown and listed below, depending on how many available custom dimensions you have available:
- Client ID (Scope: User or Session) – Required
- Lead Status (Scope: User or Session) – Required
- Lead ID (Scope: User or Session)
- Lead Score (Scope: User or Session)
- Lead Industry (Scope: User or Session)
- Lead Rating (Scope: User or Session)
- Opportunity ID (Scope: User or Session)
- Opportunity Probability (Scope: User or Session)
Note from Google:
“Whether you use session or user scope for your custom dimensions depends on your business model. For example, if you sell multiple types of products, and are gathering multiple lead forms per user, a session-scoped custom dimension works better than a user scoped dimension, because a user scoped dimension will be overwritten by subsequent leads for that user.
You should apply this same consideration to all of the Salesforce fields listed in the example above, as well as any other custom fields you wish to import.”
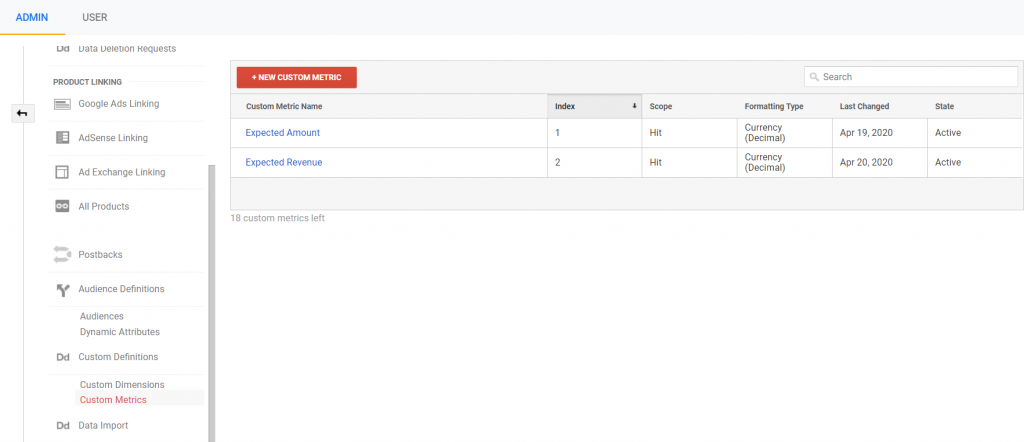
3. Go to your Google Analytics property, and open Admin – Custom Definitions – Custom Metrics.
4. Click “New Custom Metric” and create the following custom metrics as shown and listed below:
- Opportunity Amount (hit)
- Expected Revenue (hit)
Send the Client ID to Salesforce
To import Salesforce data into Google Analytics, we need a common ID or key that both Salesforce and Google Analytics share. For this, we’re going to use Google Analytics Client ID, which is a cookie generated by Google Analytics for each visitor on your website.
Set the Client ID Variable in Google Tag Manager
Within Google Tag Manager, we’ll setup a variable with the following code:
function() {

var tracker = ga.getAll()[0];

var clientId = tracker.get('clientId');

});
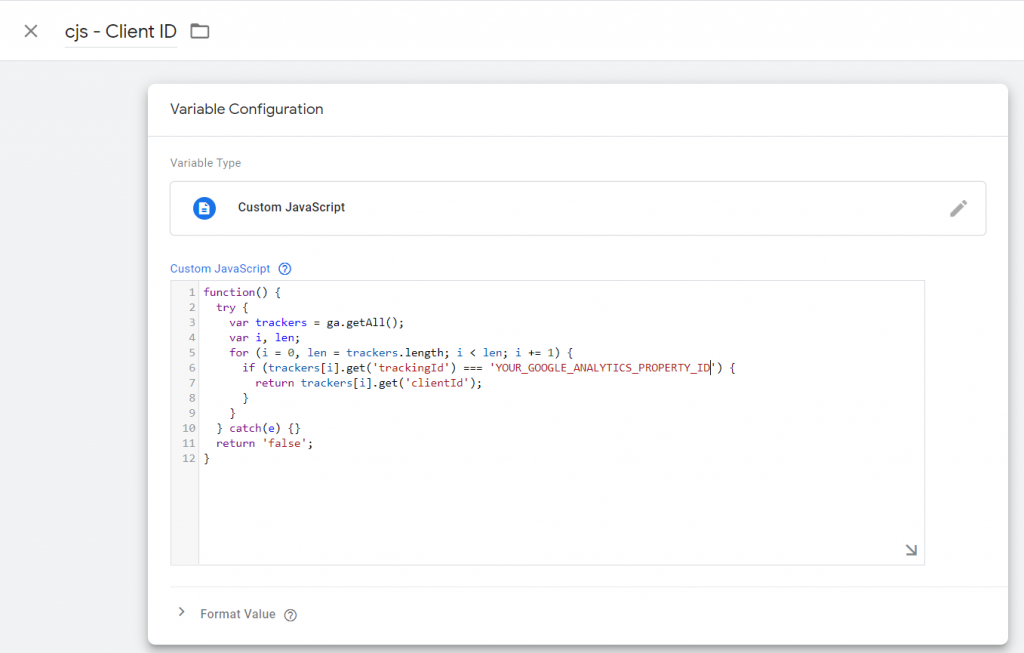
And if you have multiple Google Analytics scripts on your page, such as when software vendors embed their Google Analytics tag, you can use this instead:
function() {

try {

var trackers = ga.getAll();

var i, len;

for (i = 0, len = trackers.length; i < len; i += 1) {

if (trackers[i].get('trackingId') === 'YOUR_GOOGLE_ANALYTICS_PROPERTY_ID') {

return trackers[i].get('clientId');

}

}

} catch(e) {}

return 'false';

}
Prepare to Save the Client ID and UTM Parameters in Every Salesforce Lead
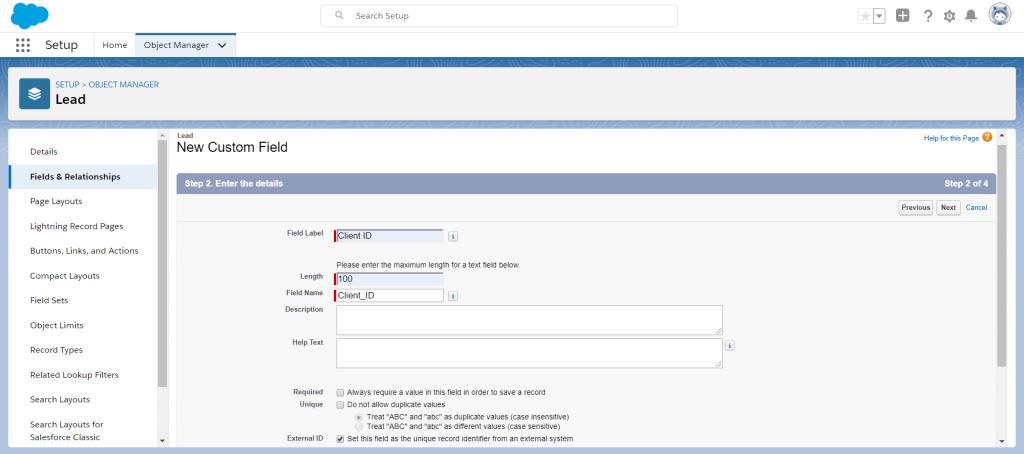
Before being able to send the Client ID to Salesforce, you’ll need to create a custom Lead field. To do this, you’ll need to:
- Go to your Salesforce account
- Setup > Objects and Fields > Object Manager
- Click Lead
- Fields & Relationships
- Click New
- Set the following values: Data Type – Text, Length – 100, and Field Name – Client_ID
- Check the checkbox for External ID
- Click Next
- Click Save
Sending the Client ID and UTM Parameters to Salesforce in the Form Submission
Now we have the Client ID field ready in Salesforce, filling that field could be done in different ways.
Whatever method you choose, what matters is that you’re sending the Client ID for every form submission to Salesforce.
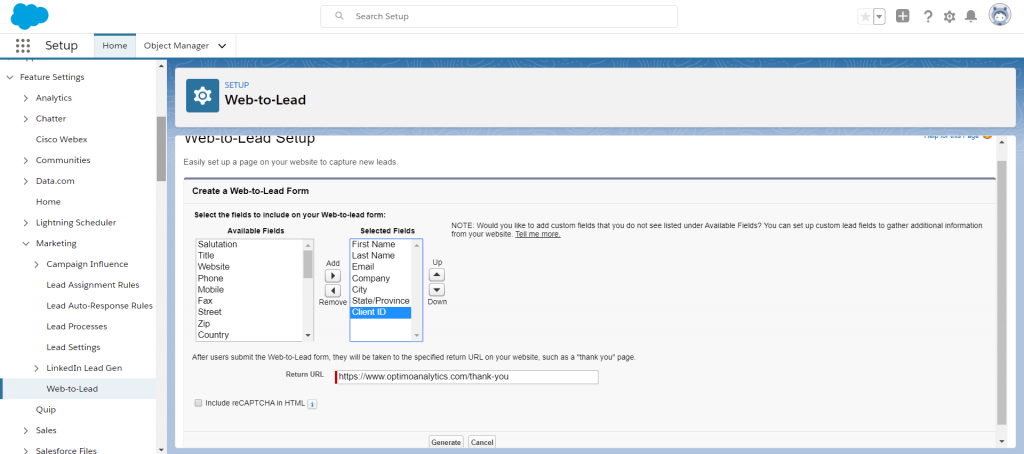
One way is using the Web-to-Lead form which you can generate or access:
- Go to your Salesforce account
- Setup > Feature Settings > Marketing > Web-to-Lead
- Click “Create a Web-to-Lead Form”
- Under the list of Available Fields, find the Client ID and the UTM parameters field you previously created, and move it to the right under Selected Fields
- Click “Generate”
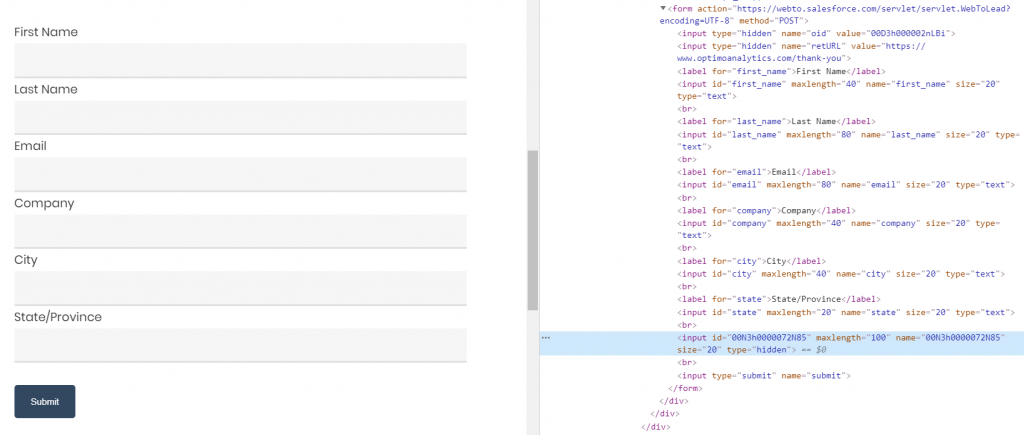
- Copy the HTML code that you can add on your website
Any lead form that you use, must have the hidden field (so visitors don’t see it or be able to change it) that will hold the value for the Client ID and UTM parameters, that way when the person submits the form, the Client ID and UTM parameters will be sent to Salesforce.
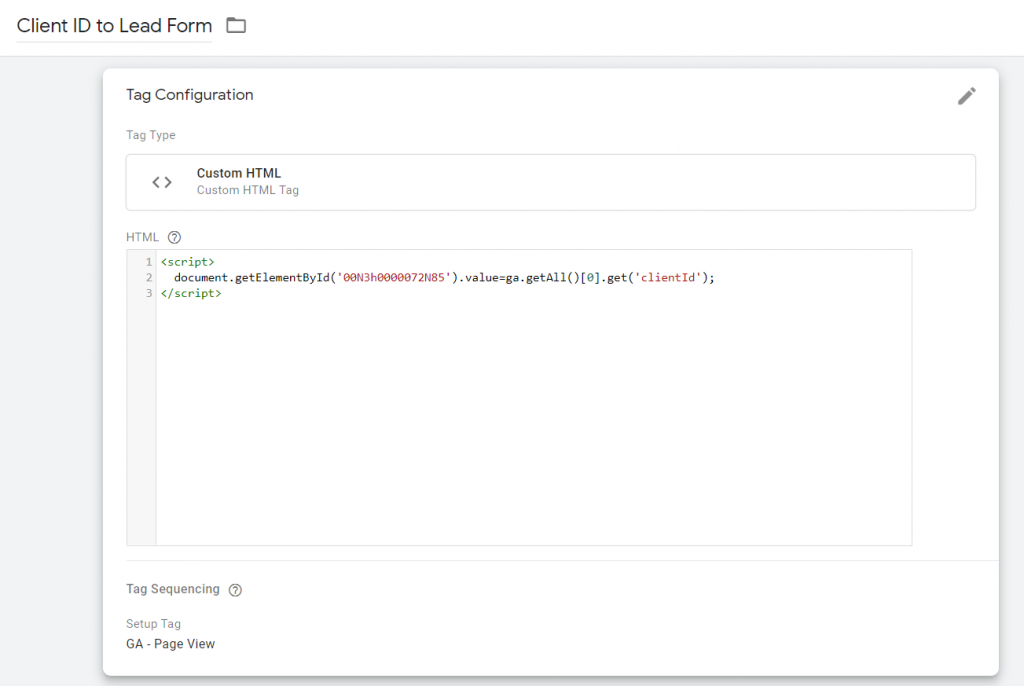
Since we’re using Google Tag Manager (GTM) for our solution, we can now create a tag in GTM to pass the Client ID value (also add UTM paramerters) to the Salesforce form you already have placed on the website. You should have this script fire only on pages with a the form(s) present.
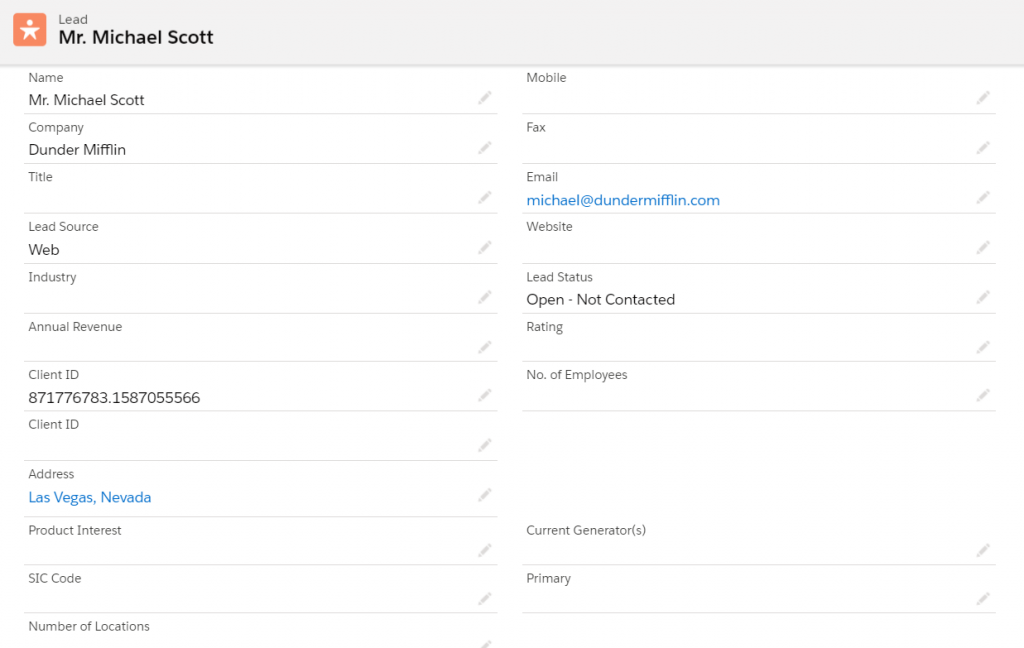
Once this is all setup, make sure to test by submitting a lead form and go to your leads to ensure the Client ID was saved along with all your other lead fields, and it should looks something like this:
Map the Lead Client ID Field to Opportunities
So far we’ll be able to track Leads in Salesforce, but let’s also track Opportunities, the stages and sales, and for this we’ll need to pass the Client ID from the Lead to the Opportunity created from the Lead.
To do this, you’ll need to:
- Go to Setup > Objects and Fields > Object Manager
- Select “Opportunity”
- Go to “Fields & Relationships”
- Click on “New” to create a new custom field
- Name the field “Client ID”, Data Type: Text, and Length: 100 (same thing that was done for a Lead)
- Go back to Object Manager, and click on Lead this time
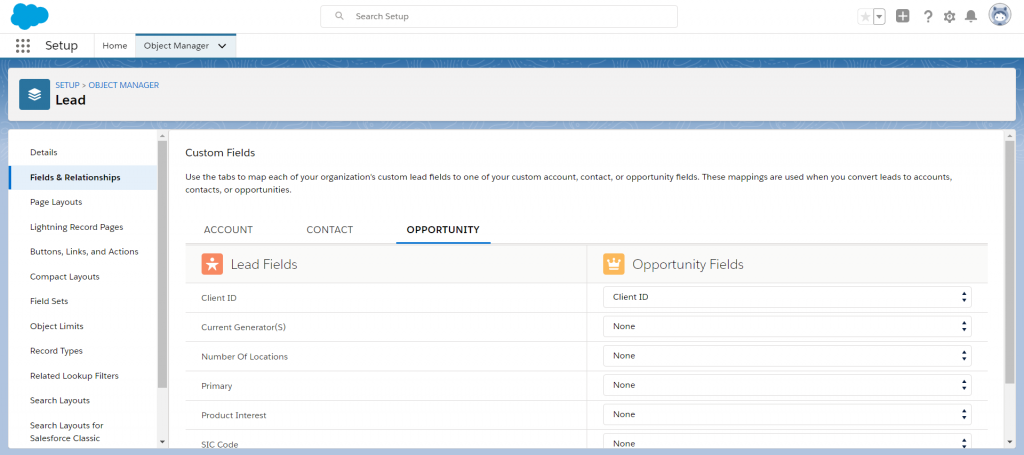
- While in the Lead object, click on “Map Lead Fields”
- Click on the Opportunity tab
- Match up the Client ID field for Lead to the Client ID field for Opportunity
- Click Save
Getting It All To Work Together
Sending all the Salesforce Lead and Opportunity Changes to Google Analytics
This is usually the most challenging part, getting the data to sync between Google Analytics and Salesforce, which requires either:
- You or your team manually exporting your Salesforce data and uploading in Google Analytics daily/weekly
- In-house resources to develop an internal application to do this ($$$)
- Outsourced software development company or marketing agency to build this for you ($$$$)
- Use a platform built to do this for companies and updates hourly ($)
Here, let’s go through how to set it up in Optimo Analytics:
- Sign up for a free Optimo Analytics account.
- Go to Integrations to connect your Salesforce account
- Go back to Integrations to connect your Google Analytics property
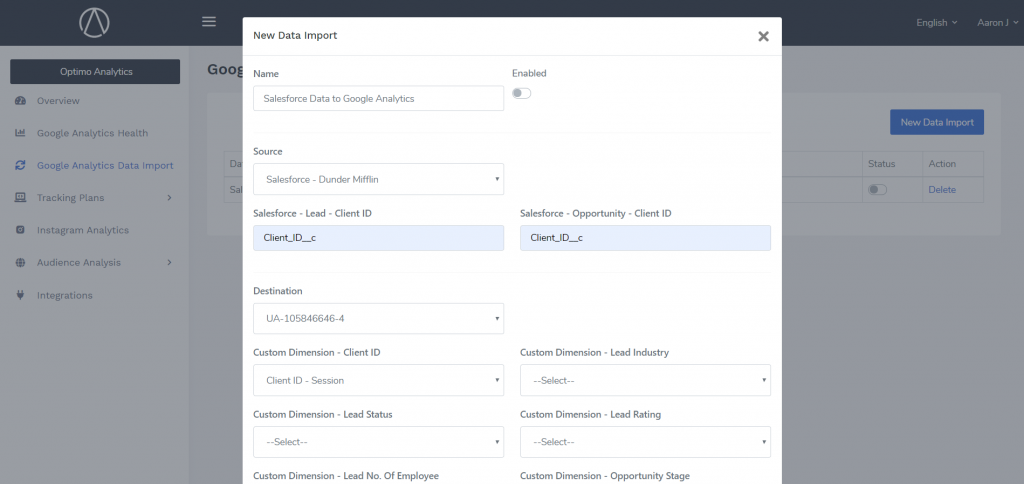
- Go to Data Import, and click on “New Data Import”.
- Set Destination as your connected Salesforce account, and for your destination, set it as your Google Analytics property.
- Click “Save”
- Done!
Setup Google Analytics Goals to Measure Salesforce Performance
Now that you’ve set up everything needed, the last part is measuring the performance of these events using Goals.
To do this, you can set up a few Google Analytics Goals that can be considered KPI”s for the team to gauge the lead generation efforts.
First, you’ll need to know the format of how the events will be coming through from Salesforce for Leads and Opportunities.
| Leads | Opportunities | |
| Event Category | salesforce | salesforce |
| Event Action | leads | opportunities |
| Event Label | {{lead_status}} | {{opportunity_stage}} |
| Event Value | – | {{opportunity_amount}} |
To read more about setting up the Goals in more detail, check our our documentation here:
For example, we can easily set up a Google Analytics Goal for new leads, by doing the following:
- Log into your Google Analytics account
- Go to Admin > Goals
- Click on “New Goal”
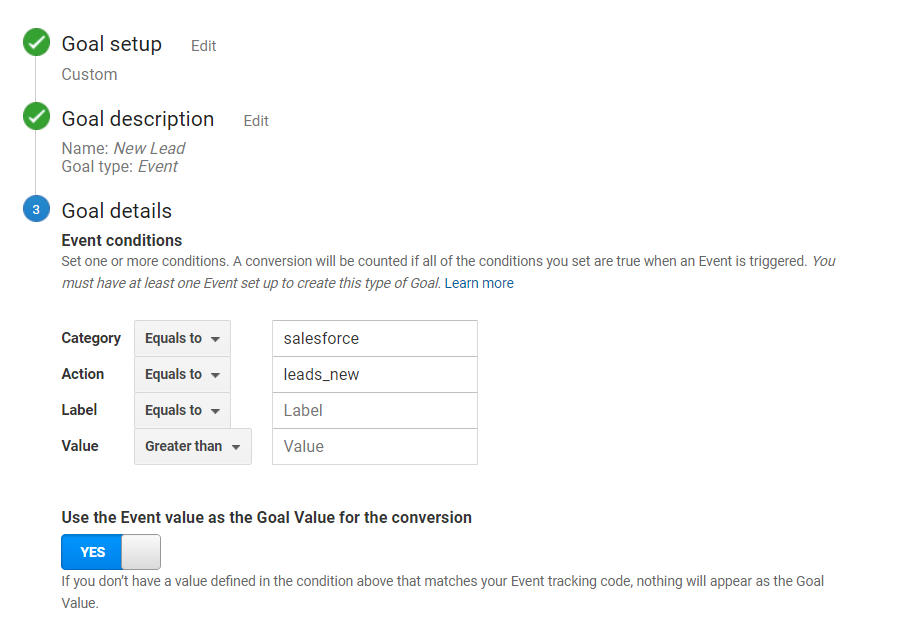
- Goal setup: Custom
- Goal description
- Name can be anything, here I called it “New Lead”
- Type: Event
- Goal details
-
- Category: salesforce
- Action: leads
-
- Done!
Moving forward, every time there’s a new lead created in Salesforce, it’ll automatically send an Event to Google Analytics, and create a conversion for this “New Lead” goal.
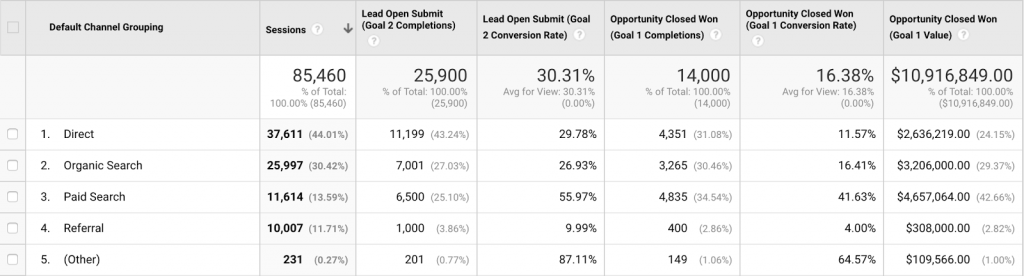
See Your Salesforce Data in Google Analytics
Once this is complete, you’ll start to see data come through to be able to see which channels, sources, mediums, campaigns, keywords, ads, pages, blog posts, etc. are producing the highest quality and qualified leads (and which aren’t).