What cost data can you upload to Google Analytics?
To upload cost data into Google Analytics, there are certain data fields that you need to include in the file that you import into Google Analytics.
https://support.google.com/analytics/answer/10071305
Required
There are the fields you must include when uploading your cost data:
- Campaign ID (utm_id)
- Source (utm_source)
- Medium (utm_medium)
- Campaign name (utm_campaign)
- Date (ISO 8601: YYYY-MM-DD)
At Least One
The obvious selection is Cost, but you still need only include one of the following:
- Clicks (daily value) (optional)
- Cost (daily value in the format 0,000.00) (optional, but expected)
- Impressions (daily value) (optional)
The Problem With Importing Data Manually Into Google Analytics
Google Analytics cannot currently directly import data from Facebook Ads or other advertising platforms that are non-Google. Users must instead import data manually from other services, such as Facebook Ads, Twitter Ads, LinkedIn Ads, and other platforms you may be using.
This process will need to be done regularly, and if you forget to import data or make a mistake, your reports will be based on incomplete data.
How to Import Facebook Cost Data
Setup Facebook Dynamic Parameters for Each Ad (Optional)
Adding UTM parameters manually to each of your ads can be a time-consuming process. The Dynamic URL Parameters Builder makes it easier to automatically inject details from your campaign into your ads.
Facebook Ads supports the following URL dynamic parameters to place on your ads:
- ad_id = {{ad.id}}
- adset_id = {{adset.id}}
- campaign_id = {{campaign.id}}
- ad_name = {{ad.name}}
- adset_name = {{adset.name}}
- campaign_name = {{campaign.name}}
- placement = {{placement}}
- site_source_name = {{site_source_name}}
And example of a starter template that can help you get started below. Feel free to modify according to your needs!
utm_source={{site_source_name}}&utm_medium=paid_social&utm_campaign={{campaign.name}}&utm_content={{ad.name}}&utm_id={{campaign.id}}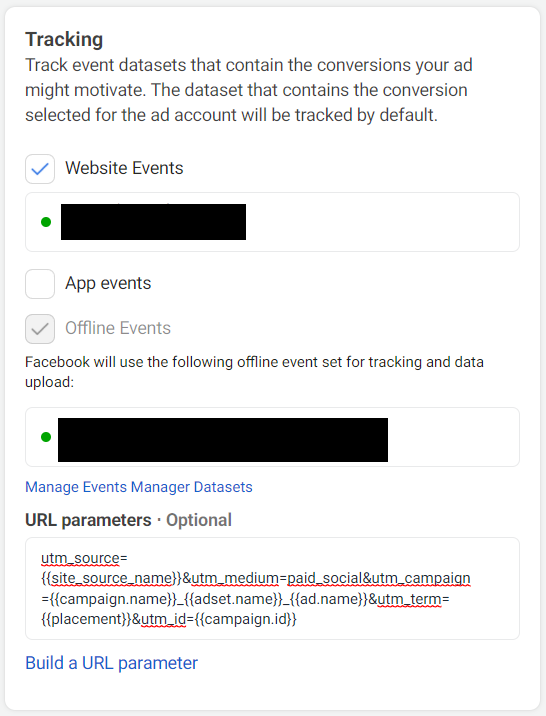
Read More: https://www.facebook.com/business/help/2360940870872492
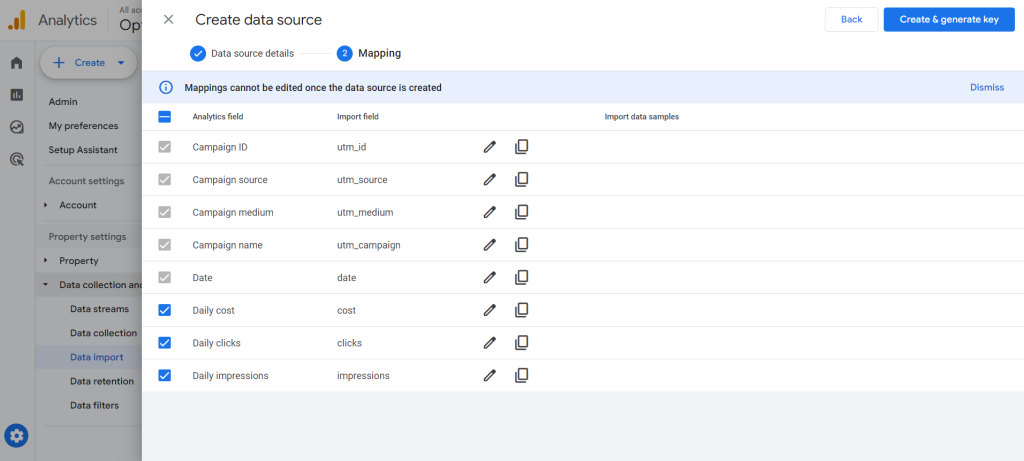
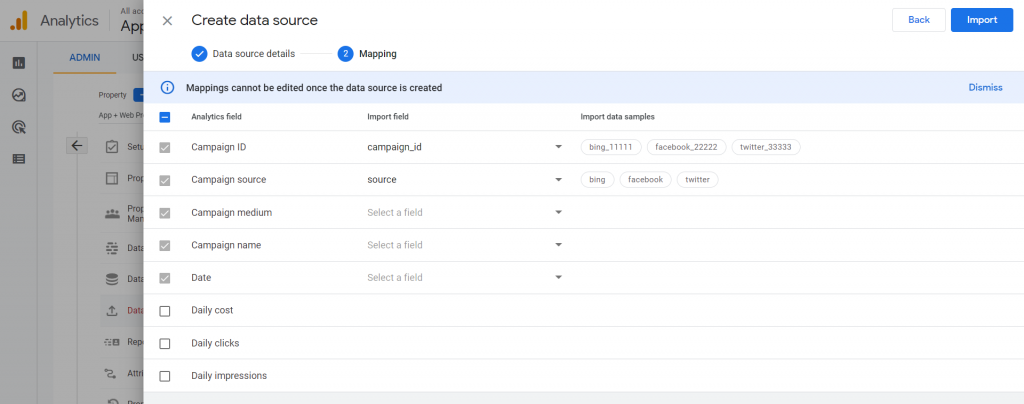
Setup a Data Source in Google Analytics for Facebook Ads Data
- Sign in to Google Analytics
- Click on the ‘settings’ icon in the left corner to go to ‘Admin’, and navigate to the property to which you want to upload data
- In the PROPERTY column, click ‘Data Import’ to display the Data Source table
- Click the ‘Create Data Source’ button
- Name the Data Source
- Upload the CSV file you’d like to import into your GA4 property
- Match up the ‘Import field’ to the correct ‘Analytics field’
- Click ‘Import’
Read More: https://support.google.com/analytics/answer/10071305
Import Data Into Google Analytics (Manually)
This is assuming you followed our Dynamic Parameter section for Facebook Ads. If you’re using your own UTM strategy, it will be the same process, you’ll just need to adjust it for your requirements.
Export Raw Data from Facebook Ads
- Go to Facebook Ads Reporting
- Select your report date range. This may be “yesterday” if you’re doing a daily import, or “Last 7 days” if weekly.
- Select the “Breakdowns” that you need. We’ll use the ones required by Google Analytics that we used for the example Dynamic Parameters template.
- Day
- Campaign Name (campaign.name)
- Campaign ID (campaign.id)
- Ad Name (ad.name)
- Platform (site_source_name)
- Select the “Metrics” that you need. We’ll use the ones required by Google Analytics.
- Amount spent
- Impressions
- Link clicks
- Click “Export” button on the top right corner
- Select “CSV (.csv)” option
- Uncheck “Include summary data”
- Click “Export” button
Prepare and Upload Data Into Google Analytics
You’ll need to update the Column names in the exported CSV file, following the format that Google Analytics requires and based on how you setup your Data Set.
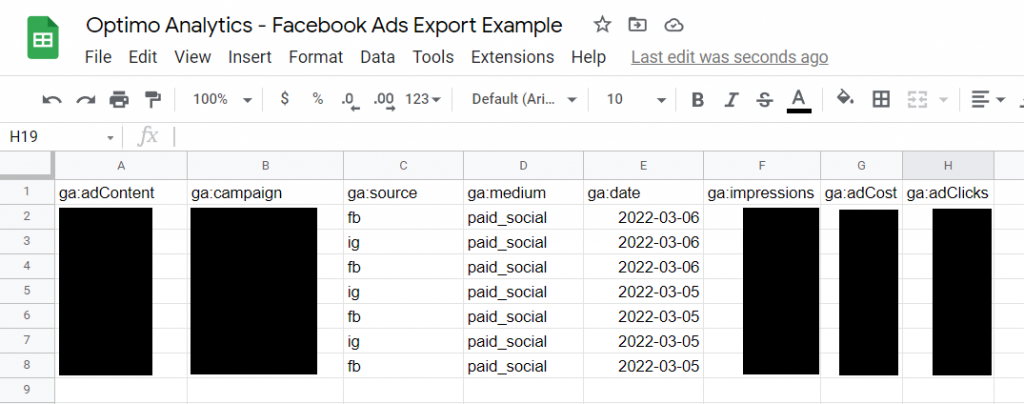
Rename column names in CSV export
- Day —-> date
- Campaign Name —-> utm_campaign
- Platform —-> utm_source
- Because of the way Facebook appends URL’s to links, you’ll also need to change “facebook” to “fb”, and “instagram” to “id”
- Amount spent —-> cost
- Impressions —-> impressions
- Link clicks —-> clicks
- Add a new column called utm_medium and as the value, add “paid_social” (or whatever you prefer)
Import prepared CSV file
- Go to Settings
- Under your property, select “Data Import”
- For your data set, click “Manage uploads”
- Click “Upload File” and upload your file.
Prepare and Upload Data Into Google Analytics (GA4)
For Google Analytics 4 (GA4), it’ll be a lot each in this section. You can simply upload the file that you downloaded directly from Facebook Ads, and map each column to the correct field.
Import CSV file
- Go to Settings
- Under your property, click “Data Import”
- Click “Create data source”
- Give it a name, and select “Cost data” as the Data type
- Click “Upload CSV” and map the columns to the the corresponding data field in GA4.
Keep in mind that you’ll need to repeat this process daily, weekly, or monthly, depending on how up to date you need your data to be in Google Analytics.
Import Data Into Google Analytics 4 (Automatically)
- Sign up for an Optimo Analytics account
- Connect your Google Analytics property
- Connect your Facebook Ads account – Ensure you’ve been added to the Ad Account and have “View performance” access (or higher)
- Create a Data Import
- Select your Google Analytics property and data set as the Source
- Select your Facebook Ads account as the Destination
- Save
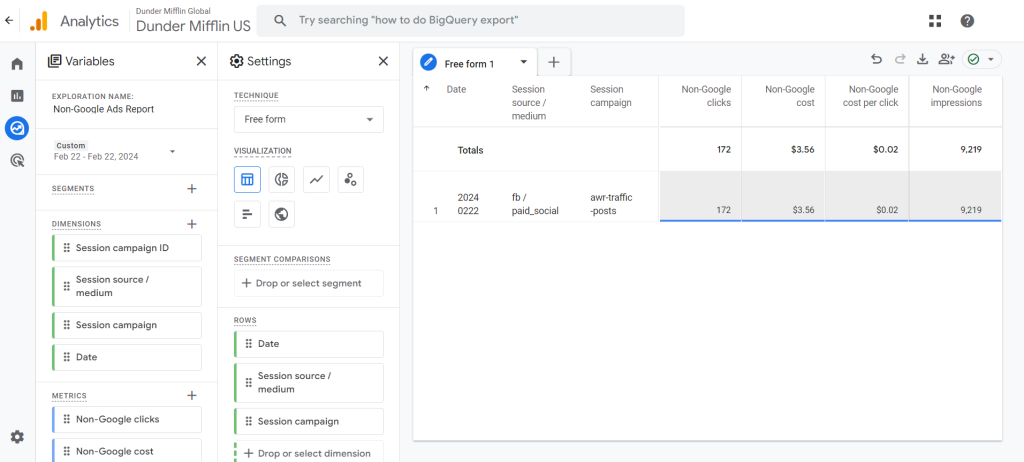
Results
Once you have set up the data import(s), you’ll receive data in Google Analytics once a day automatically, and be able to report these metrics:
- Session campaign ID
- Session campaign name
- Session source/medium
- Non-Google impressions
- Non-Google clicks
- Non-Google costs
- Non-Google cost per click
- Non-Google cost per conversion
With all the data in one place, use the links below to learn more about using this data to make better decisions that improve the ROI of your marketing spend.
Conclusion
If you’re looking to set up automatic data import for your Facebook Ads campaigns, you can follow our instructions to see the imported cost data in the Cost Analysis report, among others, in Google Analytics.
With Optimo Analytics, you can automatically import data from many data sources – not only Facebook Ads, but also LinkedIn Ads, Twitter Ads, and others.